Saturday 19 September 2015

Two hours with Puff Paint - Denise

For the second of our sessions, we decided to play with Puff Paint. There are several makes available, and we tried two of them: we both used Craftynotions Black Puff Paint, and Lisa also tried Tulip White Puffy Paint, which I'd tried on a previous occasion and didn't get on with as I didn't like the consistency. We took some of these ideas from Sarah Lawrence's book '... it's just Puff Paint' and others from Maggie Grey's 'Raising the Surface with Machine Embroidery'. Some are things I've tried myself and found successful.


Black puff paint on poly-cotton: half textured, half smooth

First, I spread the puff paint onto black poly-cotton using a tongue depressor. (I sometimes use an old cut up credit card or a drink stirrer to take the paint from the jar and to spread it.) I then patted the paint with the depressor to create a textured surface before zapping it with a heat gun.
Half heated sample - you can see the matt effect when it is 'cooked'

As it is heated, the puff paint looses it's shine and goes matt; it is finished when no shiny areas remain and you may need to apply head a second time if the paint is very thick.


You can then colour the puff paint using your favourite acrylic based paint. I also use Pearl Ex mica powders either brushed on their own or mixed with a little water if I need a more intense colour. My favourite paint is Lumiere, which gives an even coverage and good colour. On this sample I have used Halo Blue Gold:


Puff paint incised with the end of a paint brush and painted with Lumiere Halo Blue Gold
I know it looks green - I think the colour is interacting with the black!

You can do many things to create texture:


Puff paint through net, burnished with gilding wax (Gleam)
In this sample, the puff paint was spread in a thin layer through net, then zapped and burnished with gilding wax.


Puff paint through net coloured with (left to right) Pearl Ex mixed with water, dry Pearl Ex and Gleam.
In this sample, the net was removed once the puff paint was spread through, then zapped. It was coloured with Interference Violet Pearl Ex powder, both dry and wet, and Gleam.


Puff paint through organza and zapped burnished with Gleam
 Organza was used to spread over the puff paint, left in place and zapped, then burnished with Gleam.

Puff paint stamped, zapped and burnished with Pearl Ex and Gleam
Stamps can also be used on puff paint. It does need to be spread fairly thickly before applying the stamp. This was zapped and burnished with dry Pearl Ex and Gleam. After impressing the puff paint, I used the stamp to print onto a piece of white fabric. The applied puff paint wasn't thick enough to give a very raised effect, but could be enhanced with other media and stitch.


Puff Paint stamped onto white fabric
I did try a few more techniques, and will be adding them in the next few days.

Denise


Wednesday 9 September 2015

2 hours with Tyvek - Lisa

Denise & I spent a nice, calm 2 hours making Tyvek beads. As I haven't made these before I took some notes!

If you haven't used Tyvek at all before you need to work in a well ventilated room because you do get fumes from the heating process, and have a silicone sheet or tile handy to rest your heat gun on.

Denise had lots of ready coloured Tyvek available, and the top tip here is pre-cut your strips or long triangles the same size if you want your beads the same size. We liked the Tyvek coloured with Jacquard Luminere, although lots of different paints etc. colour Tyvek well and we wrapped the rolled strips with polyester thread, metallics give a nice finish.

Denise wrapping the first bead - the polyester thread acts as a resist

My first attempt with a snipped strip

A thinner strip to make a smaller bead - heating the flattish part first helps to seal the bead


Double snipped strip

After heating

Using a triangular strip of very light weight uncoloured Tyvek

The Tyvek was quite difficult to heat and tended to completely disappear in parts

Tyvek covered with synthetic lightweight fabric

Mmm - this didn't work, maybe too thick

I tried bonding the fabric to the Tyvek but again not very successful
If your Tyvek goes a bit 'blobby' looking, give it a quick roll across your tile while it's still hot and you get a nice smooth effect. Looking forward to next week!

2 hours with Tyvek - Denise


Lisa and I had our first play session on Wednesday. She had not made beads with Tyvek before, so that was our starting point.


Lisa making Tyvek bead
We started with the type of beads I usually make; triangles of painted Tyvek wrapped around an orange stick and fastened with polyester metallic thread.
Lisa's bead in progress


Some finished beads
Then the experiments started. 'What if....?'

What if I cut a different shape?

Not much difference - slightly rounded ends
What if I cut a fringe?
Fringe wrapped round orange stick

Half way through heating

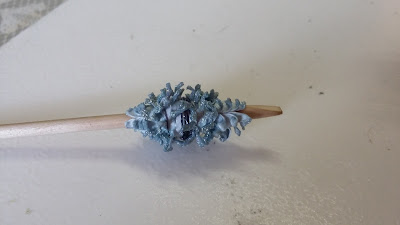
Finished bead
We really liked this effect, so we did some more, including trying fringing at both ends.

Single fringe

Double fringe

Double fringe wrapped
Double fringe with one side heated
Completed double fringe bead
This is the result of our two hours work:
Denise's beads

Lisa's beads
We will be back next week with another Two hours with ......

Denise